Imagine a situation: Invoices need to be approved by approvers in the “Pending approval” Status, but every country has its own approver that should address the invoice. No one else can take action on the Transaction in the “Pending approval” Status, only the correct approver for the given country. How do you ensure that? By creating Assignment Groups and Assignments.
General setup
To create an Assignment Group, simply select a comprehensive self-explanatory name that will be further used in the Assignments setup, for example, “Invoice approvers”.
To create an Assignment, you need to fill in the following attributes:
- Assignment group – select the Assignment Group that will receive the created Assignment (“Invoice approvers”)
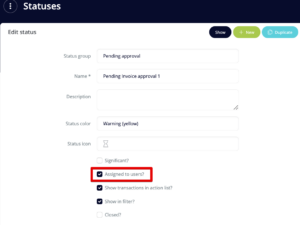
- Conditions – the Assignment will be used in the Transaction if set conditions are met (e.g. certain fields from the Transaction form should be filled in with a certain value – the country. If you select a Status, make sure that Status has the “Assigned to users?” checkbox checked.)
- Assign it to users in groups – select Groups or Users that will be assigned to Transactions that meet set conditions
- Other options
- Shared mailbox – if the Assignment is used to send e-mails from Workflow, the recipient’s mailbox will be used:
In our use case, the Assignment Group will be the same for each of the Assignments (the “Invoice approvers” Assignment Group), but the conditions will differ (each Assignment will have a different country in conditions) and the Groups will differ (Groups or Users that are responsible for approving invoices in given country).
Further setup
After setting up the Assignment Group and Assignment, you need to make sure the “Pending approval” Status has the “Assigned to users?” checkbox checked.
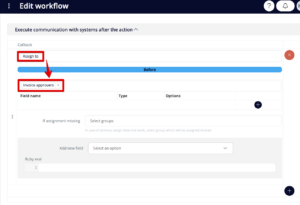
Then go to the Workflow which should result in the “Pending approval” Status and in the “Execute communication with systems after the action” section, create a new “Assign to” callback, and select the desired Assignment Group.
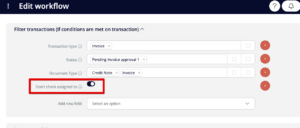
If you need any User to be able to take action from the “Pending approval” Status, even though he is not the assignee, you can do so in Workflows (it may be wanted if an administrator needs to move the Transaction to a different Status, or the creator needs to edit some details, etc.). Just open the Workflow that needs to be executed by the non-assignee and make sure you turn on the “Don’t check assigned to” option in input conditions. This will ensure that the Users with the permission to execute this Workflow can do so even when they are not assigned to the Transaction.
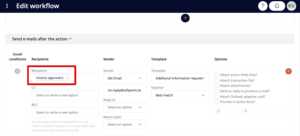
Assignments can be also used to send e-mails to Users after a Workflow is executed – just select the desired Assignment Group as the Recipient of the e-mail. This will cause that after executing this Workflow, an e-mail will be sent to the Assignment Group based on the country-mapping set in Assignments. Learn more about sending e-mails through Workflows in our dedicated article.