
After the Workflow has been executed, various actions can happen in Flowis. Read further to learn about all the options that can happen.
Execute communication with system after the action
In this section you can set up the behavior which will happen after the Workflow is executed. Each callback type performs different action, but all of them can have specific conditions set up if needed – the callback will be performed only if set conditions are met on the Transaction.
- Assign to – the Transaction will be assigned to the selected Assignment Group (Assignment Groups and Assignments need to be set up for this to work, learn more about it in our separate article).

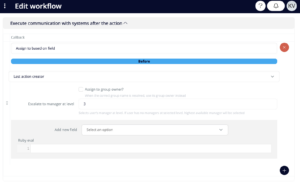
- Assign to based on the field – the Transaction will be assigned to Users based on the selected Transaction field. Only fields that are UserDataType or GroupDataType can be used (for example – if there is a “Responsible person” field on the Transaction, you can select it in this callback and each Transaction will be assigned to that User). If the selected field is a GroupDataType, you can check the box “Assign to group owner?” and the Transaction will be assigned to the owner of the group (set up in Groups). If the selected field is a UserDataType, you can automatically assign the Transaction to his manager at any level using the “Escalate to manager at level” field (the user needs to have his manager set up in Users. If the user has no managers at the selected level, the highest available manager will be selected.).
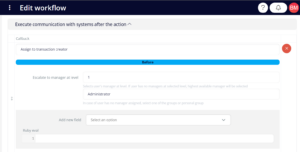
- Assign to transaction creator – the creator of the Transaction will be assigned. You can assign the Transaction to the creator’s manager at any level using the “Escalate to manager at level” field (the User needs to have his manager set up in Users. If the User has no manager at the selected level, the highest available manager will be selected.). If the User has no manager at all, the Transaction would be assigned to himself, which may not be wanted. That is the reason why there is an option to “Select groups” – here selected Groups will be assigned when no manager is found.
- Assign to latest assignment based on action status – the Transaction will be assigned to the same Users or Groups as when the Transaction was in the same status the previous time (e.g. the Transaction is assigned to a certain User in “Pending approval” Status. However, the assignee needs more information and sends the Transaction back to its creator. When the creator adds information and sends the Transaction to “Pending approval” Status again, it will be assigned to the same User as for the first time).
- Copy previous assignment – the Transaction will be assigned to the same Users or Groups as it was in the previous status (not considering which status was the previous one).
- Copy previous comments – the comments from the previous Transaction’s Status will be copied to the output status of this Workflow.
- Copy previous e-mail addresses – the e-mail addresses from the previous Transaction’s Status will be copied to the output Status of this Workflow.
- Create transactions from iterable – if the Transactions contains any TableDataType, you can create a new Transaction from each of the rows from that Table using this callback. However, it will require a little bit of coding. First, you need to set the Iterable (the name of the table which we want to use and create new Transactions from), the Transaction Type for the newly created Transactions, the Sequencer which should be used for them, and the Status they should be put in. Then you need to set up the fields that should be filled up for these new Transactions – this is the section that requires coding, so please, contact your IT administrator to finish this setup for you.
- Disable for creator – the Workflow will be disabled for User which created the Transaction (e.g. if we want to avoid situations where the creator could also be the approver)
- Ruby eval (“after/before execution” callback) – if none of the callbacks can do what you need, contact your IT administrator who can write here a code that will perform anything you need to do.
- Run interface configurations – if there are any Interface Configurations that should be run after the Workflow is executed, select them here and put them in the correct order (they will be executed one after another).
- Set anchor – mark a point in the workflow to which you want to get back after certain additional actions are done (e.g. in the approval process of the Transaction (using Approval Groups), some of the approvers may want to ask additional questions. But you do not want the Transaction to start the approval process from the beginning after having those questions answered – you want it to continue where it was previously stopped. So you set anchor to this approval workflow to not lose the previously given approvals)
- Return to anchor – return to the point which you set as anchor in the previous step
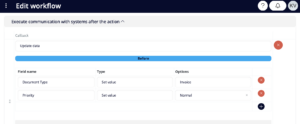
- Update data – will update data in any of the fields after the Workflow is executed. You can either set a fixed value or write a Ruby code that will decide which value should be filled in.
Continue to our next article to learn how to set up sending e-mail notifications after the execution of a Workflow.
