
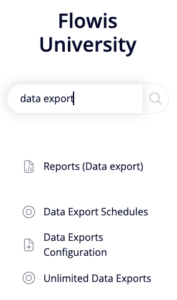
Flowis allows you to create customized Data Exports with all sorts of data you may need whether you need to create just an export of specific columns from any of the Definitions or Transactions, or you need to create a pivot table out of them; whether you need to have it available wherever you wish by one click, or you want it to be sent to specific e-mail addresses in a specific time. All the details about Data Exports are set in the Data Exports Configuration section. Learn how to set it up in this article.
How to Create New Data Export Configuration
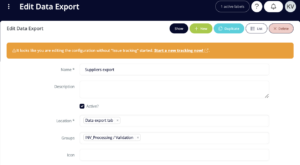
- Name – name of the Data Export. It will be displayed in the Download button or Data Exports Custom Tab. It should be short and self-explanatory.
- Description – not visible to the public, just a piece of information for administrators
- Active – must be marked as active to work
- Location – determines the location from which a User can approach the Data Export. You can choose as many of them as you wish, but at least one needs to be selected.
- Download button – the Download button on the right side of the screen in a specific Custom Tab. The Data Export Configuration needs to be added to that specific Custom Tab in the “Available downloads” field (available for Action List, Personal Action List, Definitionable, Table Data Type, and Transactions Menu Items)
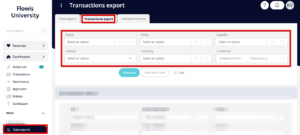
- Data export tab – the “Data exports” tab in the left menu
- Groups – which Groups will have access to download the data
- Icon –
Export Definition
- Data export type – what kind of data will be contained in the Data Export. Each type has different additional options that need to be set up – they are further described in this paragraph.
- Attachments Data Export – will export the attachments from the selected Model (read further to learn what a Model is)
- Model Data Export – by “Model” we can mean Transactions, Actions, or any of the Definitions in Flowis. This will probably be the most used Data Export Type for you.
- Actions Pivot Data Export – creates a pivot table from actions made in Flowis (action is a run of a Workflow, an Interface Configuration, adding or editing any record in Flowis, etc.)
- Definitions Pivot Data Export – creates a pivot table from a Definition
- KPI Data Export – calculates the duration between two actions on Transactions
- Transactions Pivot Data Export – creates a pivot table from Transactions
- AHS Data Export –
- Table Data Type Data Export –
- Transactions Custom Columns Data Export –
- Transactions Data Export – exports wished data from Transactions
- Transactions Interface Validation Errors Data Export –
- File name (Ruby eval) – using Ruby eval, you can set up the name of the exported file – please, contact your IT administrator to set this up for you
- Escape numbers starting with zero – when the number starts with zero, e.g. 000123 it would be interpreted as 123 in Excel. This option will escape it as a string using Excel’s formula wrapper `=”000123″.`
- User v2 downloader (standard via Ruby) – by default a SQL downloader is used which directly uses Postgres’s COPY command to export data into CSV and optionally convert it to XLSX. This does not allow to export certain data like SecureTextDataType which is encrypted. For this use v2 of slower processing via Ruby and gems, but it allows to downloading also secured data types.
- File type – select desired file format for the Data Export
- Add report details sheet – adds sheet called Report details with information about the report. This works with FastExcel, AXLSX, and RubyXL gem as well as with the Copy to XLSX option.
- General date format – this overrides user or individual date preference. For “Copy to XLSX” please use this option and do not set up individual formats for each field as they are ignored.
- Model – Transactions, Actions, or any of the Definitions in Flowis – select which one you want to use for export using this Configuration
Filter – Which rows will be exported
For Model Data Export, fill in all the conditions for data that shall be exported – for example, Transactions created under a specific Entity, by a specific User, containing specific amounts, etc.
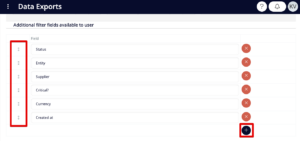
Additional filter fields available to User
If the Model Data Export is located in the Data Exports tab, you can set up additional filter fields for the Users to use so they can maximize their effectiveness while using this Data Export.
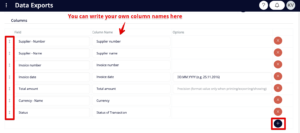
Columns
For the Model Data Export, you can set up the columns (their names and order) of the exported file. That way you can ensure the most needed information will be at the beginning of the file, their order will not be random, etc.
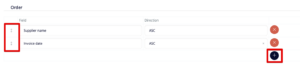
Order
Here you can set up how will be the records ordered in the finalized Model Data Export – which field is the primary to compare the data, and if the records should be ascending or descending. You can set up more than one field – they will be processed in the order that you set up here.
Scheduling
This section is important for those Data Exports that will be scheduled and sent via e-mail to the Users. It is just the first part of configuring a scheduled Data Export – read our next article to learn how to finish the configuration of scheduled reports.
- Locked to environment – the environment where the scheduled Data Export should run
- Sender – e-mail address that will be stated as the sender of the e-mail containing the Data Export
- Email template – E-mail Template that will be used when sending the Data Export. Needs to be created in E-mail Templates First
- Template matcher – E-mail template can have various versions and each version has its separate input conditions (for example, you have a separate version for each language mutation, and the conditions say for which countries should this language mutation be used).
- Best match – Flowis will select only one version of the E-mail template that matches the most conditions (Transaction’s details vs. e-mail template’s version’s conditions).
- Match all – all the versions that match any of the conditions will be used and put one after another. The one that matches the most conditions will be at the top.
- Match all – join with line – the same as “Match all”, but a line will separate the matched versions (you will see where one version ends and another one begins).
- Match all reversed – the opposite of “Match all” – the version that matches the least of conditions will be at the top.
- Match all reversed – join with line – the same as “Match all reversed”, but a line will separate the versions.
- Send when no data – whether the e-mail with Data Export should be sent even when it does not contain any data or not
